A 3000 word illustrated article showing you, step by step how to give subcutaneous fluids to your cat at home. This is one treatment that may be recommended for cats with kidney failure.
Giving subcutaneous fluids to cats an owners guide
General information Sub-cutaneous (SQ) fluid administration is providing fluids into the space under the skin from where it can be slowly absorbed into the blood and body. This is a very useful way of providing additional fluids to cats and helping to manage and prevent dehydration. With chronic renal failure, cats usually lose more fluids than usual through their kidneys, and as progresses they often become dehydrated as they do not drink sufficiently to compensate for this fluid loss. This has several detrimental effects, including potentially worsening the kidney failure - regular SQ fluid administration in the home environment can therefore be an extremely valuable part of the management regime for these cats.
How often? SQ fluids may be given as often as is needed, but for most cats that require fluid supplementation, SQ fluids arc most often provided between once a week and once a day (with 2-3 times weekly being most common).
What do I use? Your veterinarian will provide you with the fluid to give your cat, will give you instructions on how much to administer and how frequently. Also, your vet will supply you with additional material needed to administer the fluids (needles, tubing etc.). The most common fluid type given to cats is a balanced electrolyte solution known as 'Hartmann's' or 'Lactated Ringers' solution, although others are also available.
How is the fluid given? There are several different ways to administer SQ fluids, but the way that is best tolerated is usually by using a 'drip bag' (ie, the bag containing the sterile fluid for administration -this is actually most commonly given by intravenous drip, hence the name) and a length of 'drip tubing' attached to a needle which is placed under the skin.
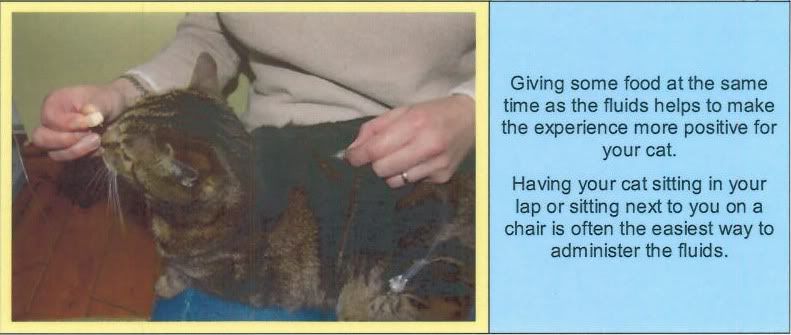
Although this sounds potentially uncomfortable, the vast majority of cats tolerate being given SQ fluids tremendously well. The drip bag is suspended above the level of the cat so that the fluid can run into the space under the skin under the influence of gravity. It usually takes several minutes to administer the fluid, and it is often helpful to cuddle, stroke or pet your cat during this period, and many people find it helpful to feed the cat at the same time, providing them with a distraction.
How much fluid is given? Your veterinarian will tell you how much fluid to administer, whether to use a single site or more than one site, and how often to give the fluids. Generally around IO-20ml of fluid per kg bodyweight can be given at a single SQ injection site (approximately 60-100ml in total for most 'average' sized cats).
A soft lump will develop under the skin at the site where the fluid has been given. This should be neither hot nor painful for the cat, and the fluid is gradually absorbed over several hours (it may take up to 8 hours for all the fluid to be absorbed). The fluids are usually given under the skin high up on the chest, but gravity will often cause the fluids to accumulate lower down on the chest or tummy. If there is still fluid under the skin from previous SQ administration when your cat is next due for fluids, no further fluids should be given and you should check with your veterinarian.
Detailed instructions on fluid administration
Equipment Your veterinary surgeon will supply you with the fluids and equipment necessary to administer the fluids along with specific instructions for your cat. This is designed as a general guide to help you.
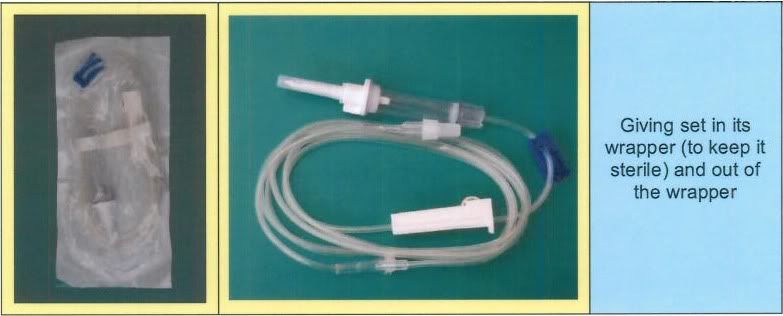
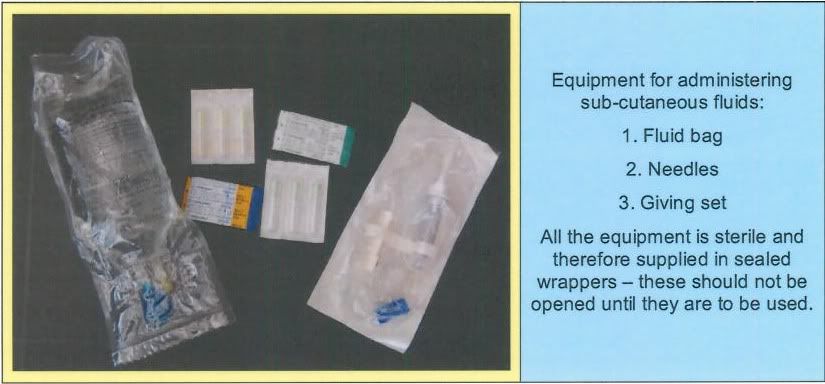 Fluid bag and giving set
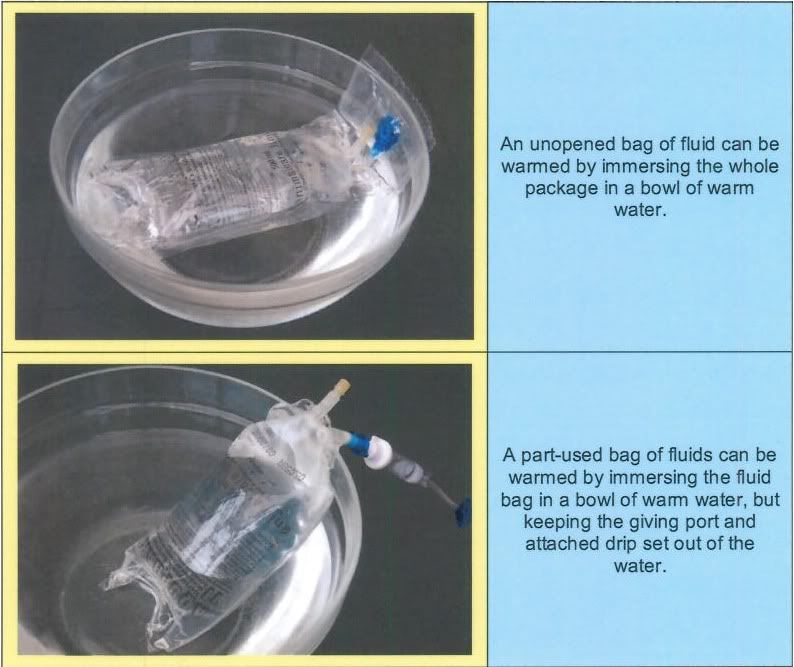
 It is helpful to warm the bag of fluids first by immersing it in a pan of hot water for 5-15 minutes. Pre-warming the fluids (to make them lukewarm) helps to reduce irritation and make the procedure more comfortable for the cat. Most intravenous fluid bags contain either 500ml of fluids or 1litre. For cats, it is most common to use 500ml bags for subcutaneous administration. Do not use the fluids if they appear cloudy or discoloured.
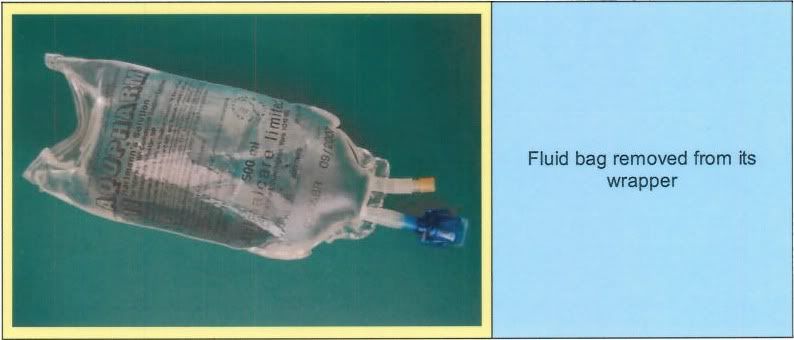
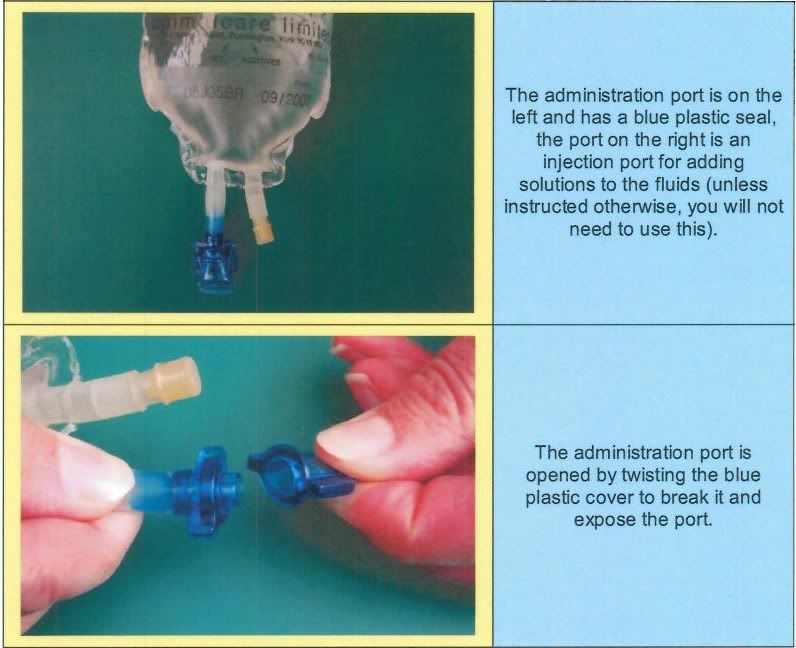
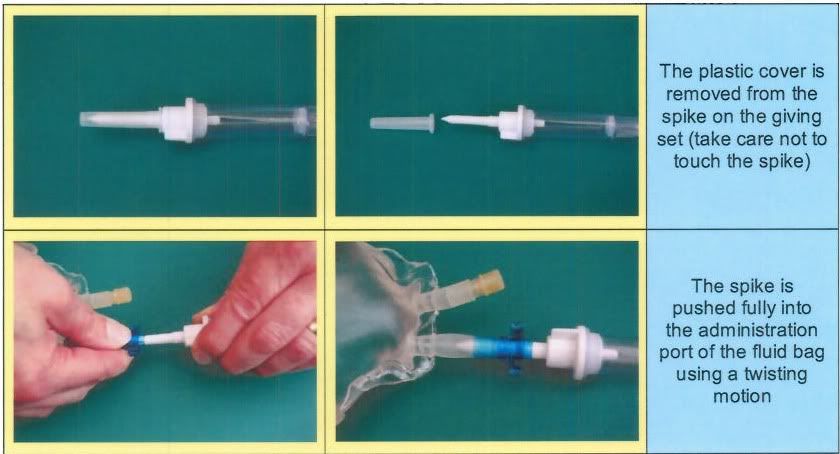
The bag of intravenous fluids usually comes scaled within an outer bag/wrapper, which needs to be removed first. At one end of the fluid bag there will be two 'ports' . One of these is an injection port for adding solutions/drugs to the intravenous fluids -unless instructed otherwise by your vet, your will not need to do anything with this port. The other is the administration port or 'spike port' and this usually has a blue plastic cover on it that will need to be pulled off (it is usually attached quite firmly so you will have to pull hard!).
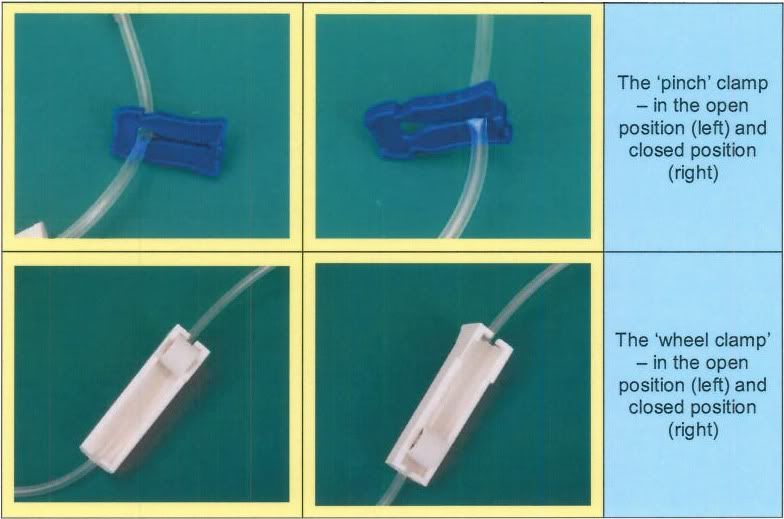
The giving set (drip set) is a long length of plastic tubing that will also need to be removed from its plastic wrapping. At one end of the giving set there is a plastic 'drip' chamber and a white spike sits on top of this (shielded by a removable cover) The other end is also protected by a cover and this is the end to which a needle is attached (later). There will also be a plastic roller clamp that serves to regulate the flow of fluids. This should be rolled down initially so that the tubing is tightly clamped to prevent fluids flowing through the tubing. There may be a 'pinch clamp' that can also be used to pinch the tube and stop any fluid flowing.
Once the clamps have been applied to the tubing, the cover over the while spike can be removed. The spike is then introduced into the giving port of the bag of intravenous fluids. You should avoid touching the white spike at all to prevent it being contaminated, and you may need to apply a twisting motion as you push the spike through to help it engage fully in the giving port. Care should be taken not to push it in at an angle as this could lead to puncturing the fluid bag.
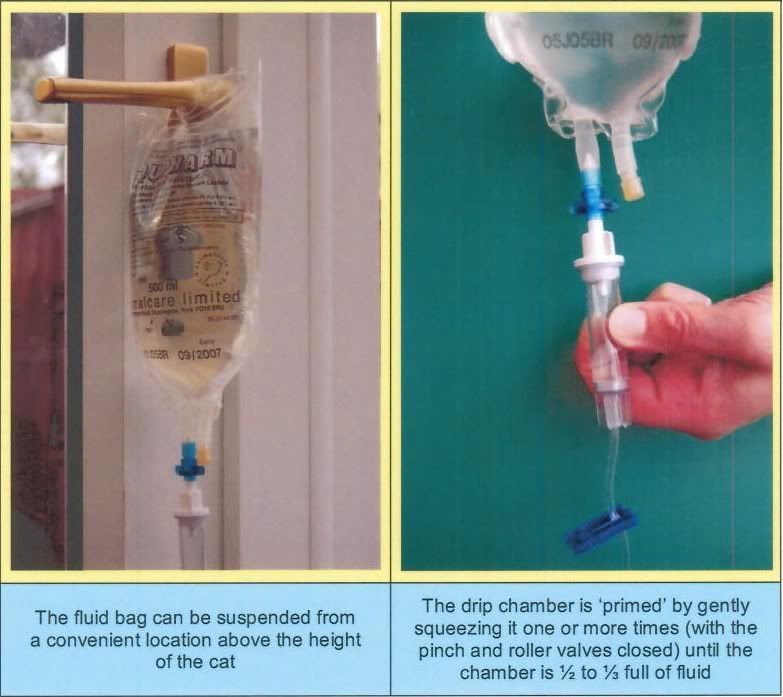
Once the giving set has been attached to the fluid bag, the bag should be suspended – it can be hung on any suitable hook using the plastic tab at the end of the bag opposite the giving and administration ports.
While the bag is suspended, the drip chamber should be 'primed' -this chamber needs to be approximately ⅓ to ½ filled with fluid and this is achieved by gently squeezing and releasing the sides of the chamber while the fluid bag is suspended (N.B. make sure the clamps on the drip line are closed while this is being done). This process can be repeated until the chamber has sufficient fluid present.
Once the drip chamber is primed, the tubing also needs to be primed (filled with fluids) to remove air from the giving set. With the fluid bag still suspended, the pinch clamp is first released, and then the roller clamp is gradually released to allow a slow flow of the fluids through the tubing you will see a steady flow of drips in the drip chamber, and you will see the fluids gradually filling the tubing. Run fluid through the tubing until all the air and air bubbles are removed and fluid is emerging from the end. When this is done, use the roller clamp (0 seal off the tubing again and prevent any further flow of fluids.
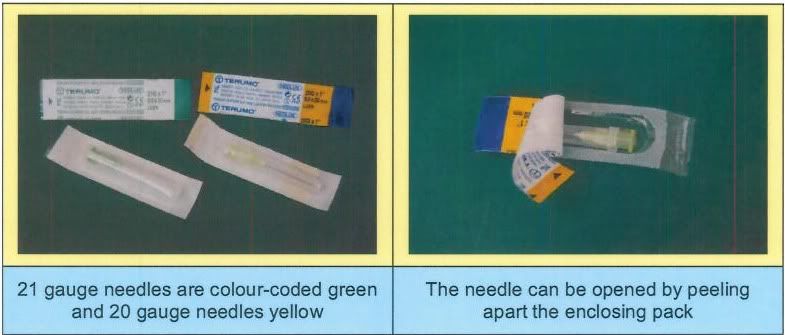
You are now ready to place the needle on the giving set. The needle should be removed from its protective cover, but the removable hard plastic cover over the needle itself should be left in place. Most commonly a 19, 20 or 21 gauge needle is used (this is the thickness of the needle) and a needle of 1 inch in length.
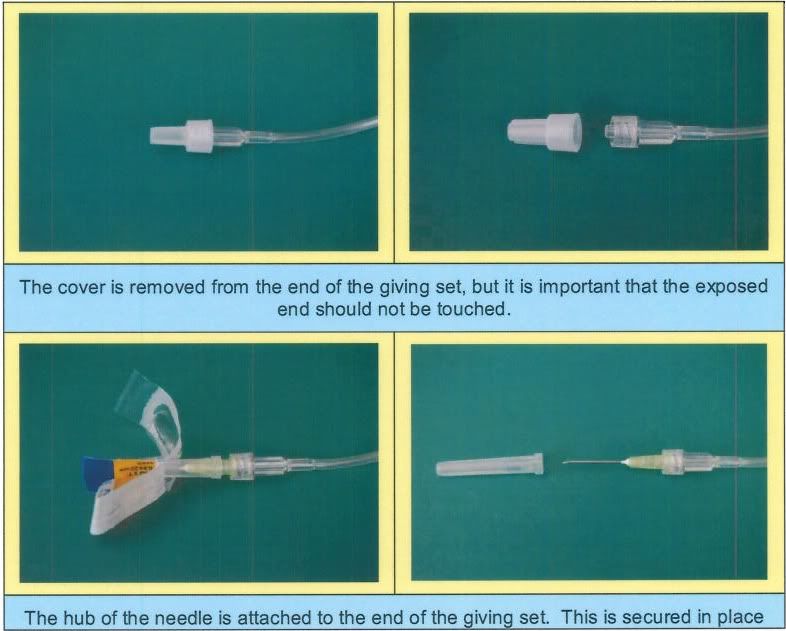
The cover should be removed from end of the giving set, and then the hub of the needle (the coloured plastic part) can be gently twisted on making a secure attachment. Neither the hub of the needle (especially the inner part) nor the protected end of the giving set should be touched during this process to make sure they do not get contaminated.

The giving set is now ready for you to give fluids to your cat. Usually the skin at the site where the needle is going to be inserted is not cleaned or prepared in any special way (this is not usually necessary, although your veterinarian will let you know if the skin should be cleaned / prepared for your particular cat).
The fluid bag should be suspended at a height above where your cat will be sitting. Having a hook (eg. Coat wire bent into an S-shape) over the top of a door or over a door handle can be useful, attaching the bag to this hook. It is also important to have the cat in a comfortable position for the fluid administration -being cuddled on your lap, or having the cat sitting beside you on the couch would be ideal. Additionally, to make the procedure as stress-free as possible, feeding your cat or offering your cat special treats during the procedure can be very valuable.
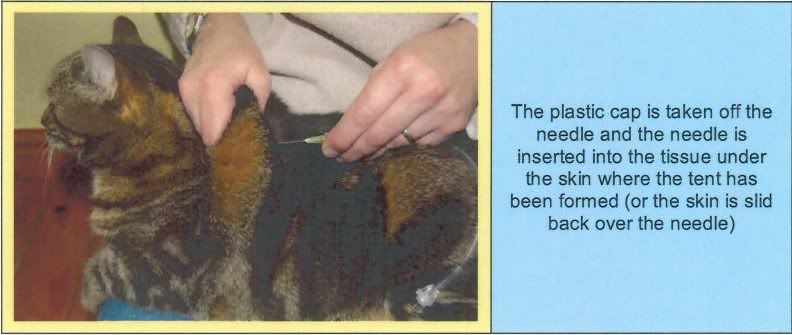
The plastic cap should be removed from the needle (by pulling the two apart, but be careful not to stab yourself with the needle"). One hand should hold the needle at the hub (avoid touching the needle itself which would contaminate it) and with the other hand, the scruff (skin between the shoulder blades) should be lifted to form a 'tent'. The needle should be inserted quickly and smoothly into the tent that has been formed (avoid 'stabbing' motions) keeping the needle parallel with the back of the cat, so that the tip of the needle is lying in the subcutaneous space. It may be easier to place the tip of the needle next to the skin and then 'pull the skin over the needle' rather than 'push the needle' through the skin. Once the needle is in place, the skin can be released, but you may need to hold the end of the drip set to keep the needle securely under the skin. It may help to insert the needle to one side of the mid-line slightly so that the fluid accumulates on the left or right side -this is especially useful if quite large volumes of fluid need to be given, as the needle can be repositioned (removed and re-inserted if necessary) to give half the fluids on each side (your veterinarian will tell you if this is needed).

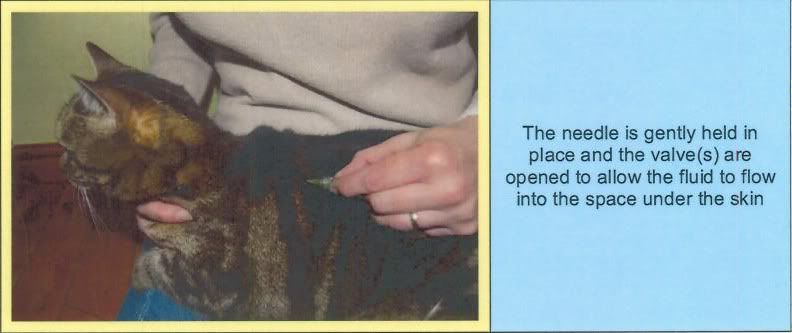
The two clamps on the giving set now need be opened to allow fluids to flow, and the roller clamp should be fully opened to allow the fluids to flow as quickly as possible. If the fluids are not flowing at a steady, fast rate (continuous flow seen in the drip chamber) you may need to either try slightly repositioning the needle and/or raise the bag of fluids to a higher level. If the needle has been put straight through the skin (this is quite easy to do and a common mistake] the cats fur will become wet immediately you open the clamps and it will be obvious the fluid is not going into the sub-cutaneous space. If this occurs, simply remove the needle from the skin, replace it with a new one, and repeat the procedure.
Your veterinarian will tell you how much fluid to administer to your cat -there are gradations on the side of the fluid bag to give you an indication of the amount of fluid that has been administered, and if you have a small set of weighing scales, these can also be used to measure the volume of fluid (each 100ml of fluid weighs I0Og). If the rate of flow of the fluid slows during the administration period, again repositioning of the needle and/or raising of the bag of fluids should be tried.
When the required amount of fluids have been administered, the clamps on the giving set should be turned off and the needle gently but firmly pulled from the skin (in one quick movement). When fluid administration is finished your cat can be treated as normal, and the fluids will usually be absorbed during the next few hours.
There may be a small amount of fluid oozing out from the site where the needle went through the skin -this is quite normal, and there may be quite a large lump where the fluid has accumulated under the skin. This can be massaged gently to help disperse the fluid and stop further fluid leaking from the injection site.
In between each episode of fluid administration, the part-used fluid bag, giving line and needle (all still attached) are best stored in the fridge, but this should be in a clean, new plastic bag that is replaced each time to ensure the fluids are kept protected. The whole system should be allowed to warm to room temperature for at least 1-2 hours before each use. and the fluids can be warmed by placing the fluid bag in hot water (as before), but suspending the bag 'upside down' in the water, and ensuring that the administration port does not become immersed. Again, fluids should not be used if they appear cloudy or discoloured.
Each time a new fluid bag is used, a new giving set should be attached, but generally only one giving set needs to be used for each fluid bag (ie, these can be left attached until the fluid bag is emptied), Old needles should not be thrown away with household rubbish, It is best to put these in a plastic screw-top bottle, and important to return these periodically to your vet (along with old fluid bags and giving-sets) for safe disposal.
Complications of fluid administration Complications associated with sub-cutaneous administration of fluids arc actually very uncommon, but if there is anything you are concerned about at any stage, seek advice from your veterinary surgeon without delay.
If your cat develops a persistent swelling at the site of injection, and especially if this becomes hard, warm and painful, this could indicate some local infection (abscess) that will require veterinary treatment.
Information taken from an article on
http://www.catprofessional.com/free_downloads.htmlThe information is the opinion of the writer in the link to the website provided and is not a substitute for veterinary/professional advice.
Purrs Owners and Staff are not responsible for the content and information provided through links to other web sites.